Friday, October 16, 2015

Technique - Exposure Compensation (In honor of a special young woman named Mira)

This blog post is in honor of a very special young woman named Mira. I hope Mira will become a better photographer than I. I'm sure if she is dedicated she will do so.
So what if you take a photo and it is slightly over exposed. That is, it is a little bit too light. You either turn your shutter speed up or close your lens (increase the f-stop) and give the exposure one less stop of light. This then makes the image underexposed or too dark. What do you do then? You could take the photo and manipulate the exposure in software loaded on your computer. If you are like me I'd prefer to try different things in the field to get the correct exposure. I'd rather be taking photos outdoors or elsewhere than sitting at a computer trying to fix images. This is where I begin to try such items as exposure compensation to get the right exposure and save the day. The exposure compensation or EV (Also known as eV) setting on digital cameras is usually in one of the menus. You have to either read your camera manual or play with the camera seetings to find the location. Below are two photos, one of the back of my digital point and shoot and the other my digital SLR.
Note the highlighted EV setting location in the first picture of the back of the point and shoot. The setting is -0.3. This indicates that the exposure that is set in the camera will be reduced by one third of a stop. That is, the image will be slightly darker than the exposure set in the camera. Also note the little pink arrows to either side of the -0.3 setting. The arrow to the right will increase the exposure by 0.3 stop for each click or toggle of the appropriate button. Thus, one click on this will set the EV to 0.0 (there will be no exposure compensation). One more click will be +0.3 more exposure and the picture will be slightly lighter. The arrow on the left side decreases the exposure by 0.3 for each click. Thus, if the camera is at -0.3 and you click the left arrow once the setting will go to -0.6. Cameras generally will allow you to change the exposure by up to -2.0 stops and +2.0 stops using the exposure compensation setting. This can normally be done in 1/3 stop increments. Thus, you can fine tune the exposure to get basically what you want it to be.
Look at the photo of the menu of the digital SLR camera (bottom photo). Just below the f-stop (F11) is a little item that indicates -2, 1, 0, 1, +2 with two lines in between each of these settings. This is the exposure compensation for this camera. By turning a dial or wheel on the camera one can move from between -2 (2 stops of underexposure) to +2 (2 stops of overexposure) in 1/3 increments. These are the same settings as the point and shoot but just displayed differently. What is the current exposure compensation setting on the SLR? If you said -1.0 stop you are correct. This means that one stop less light will be allowed when the exposure occurs (very shortly after the shutter button is pressed) and the image will look darker than with no exposure compensation. This particular SLR will also allow you to set the camera so it will make three exposures once you press the shutter. You can set it so it will make one image at no compensation, one at plus compensation and one at minus compensation. The amount of compensation can be set as well. For example, you can set the camera to take an image at -0.3, 0.0, and +0.3 stops of exposure compensation or -1.0, 0.0, and +1.0 by pressing the shutter once.
Just a side note. Look at the setting immediately to the right of the exposure compensation setting on the digital SLR. It currently is set at -2. This is a setting that permits the photographer to reduce the amount of light output by a flash. Thus, he can reduce the amount of light for the photo by reducing the flash output. Of course, a flash must be used for the photo. A setting of -2 when no flash is being used will not affect the exposure. The EV and flash settings can be used in combination to reduce the amount of light reaching the sensor that ultimately produces the image. Not all cameras have a setting to reduce or increase the flash output.
Practice with these settings. Use the same subject in the same light and take pictures while changing the EV setting. Then use the flash and use different combinations of settings of the EV and flash output to see what happens. You will notice that you can really fine tune the exposure of images using these settings.
Most people do not read the manual that comes with their camera. Thus, they miss little jewels like exposure compensation. I always read the manual when I get a new camera. This helps me discover where to set items like exposure compensation and discover unique abilities of the camera which I may not have known about when I purchased it. I'll end up re-reading the manual for some setting until I have used it enough that I no longer need the manual for that particular use.

Thursday, February 21, 2008

Technique- Ways to Make Your Images Sharp

Unless they're trying to be creative, most photographers don't want their pictures to look fuzzy or like their out of focus. Early on I did not realize why my photos looked like they were out of focus when I knew I clearly focused on the subject. I eventually found out it was camera shake. As usual, there are some general rules which will help you avoid this situation.

The best way to get a very sharp picture is to use a tripod. Not only will it make for very sharp pictures, it basically forces you to slow down and think more about what you're doing. You can pose your picture much better. You can look through the viewfinder or in the display and look around the frame. Is there anything in the view that you really don't want in the picture? Once I took a great photo of a group of maple trees, being tapped for their sap, lining a winding road. When I got the photo back there was a piece of trash in the lower right part of the frame that essentially ruined the whole picture. This was before the days when software was available to easily fix this problem. If I had looked around the viewfinder before I snapped the shutter I would have noticed it. Easy to do when your camera is on a tripod. In my estimation, a tripod or something similar is a necessity for landscape photos and excellent closeups are difficult to take without a stabilizing method.

A similar device is the monopod. As the name suggests, it has one foot or leg. It is relatively stable, but not as stable as a tripod. It is a little easier to set up and some fold up, take little room, and weigh just about nothing. There are times when you need to use another method to reduce shake with the monopod, such as when you are using a long lens (a lense that makes a subject a Long way off look closer). There are a number of ways to do this. The typical ones should be used when you are taking any photo- take a breath and hold it, hold the camera as still as you can, and make sure you push the shutter release smoothly (that is, don't flinch when you push it or punch down so hard the camera jerks). Another is to spread your legs far enough apart that you feel very steady. You are basically forming a tripod using your two legs and the monopod. Additional methods discussed below can be used with the monopod, like the one in the next paragraph.

Most people sway in the wind when they are standing. Don't believe me? Put a long lense on your camera, look through the viewfinder at a subject, and try to keep the subject in the center of the frame. You'll find it difficult to do, especially for any length of time. Anyone who uses binoculars knows what I'm talking about. One way to prevent this is to lean against a sturdy object. One I often use is a tree. You can also put the barrel of the lense against the tree if the lense is long enough to do so and let you see through the viewfinder or see enough of the screen on a digital camera.

What if you put your camera on a steady object other than a tripod and either pushed the shutter smoothly or, better yet, put on the timer and removed yourself from the camera and let it do the work? You'd find your pictures turn out sharp. A number of items can be used. One that has been around for a long time is the bean bag. I made myself one with rice in it. I can set the "rice bag" on a steady object, put my camera on it, compose the picture, put on the timer, and let it rip. Using a bean bag is a great way to take photos from near the ground. Another object you can use is the top, trunk, or hood of your car if it is in a good location for the shot. I have done this for landscape photos when I forgot my tripod. Putting your bean bag under the camera helps protect that paint job! I have set my camera on a stump to steady my camera when taking photos. The number of steady objects you can use is just about endless, limited only by your imagination. Photography gear manufacturers are always coming up with new ones.

There is a rule when handholding a camera that will help you reduce the number of blurry images you take due to camera shake. The rule is that you should not have a slower shutter speed than 1/the length of your lense. Let's say you are using a 70-210mm zoom lense on the 70 mm setting. You should use a shutter speed of at least 1/70 of a second. At least on SLR cameras, there is not 1/70 second setting. So, you go up to the next fastest speed. In this case, it would be 1/125 second. If your zoomed out to the 210 mm setting you should use no slower than a 1/250 second shutter speed. Again, this is a general rule. Some people can hold a camera more steady than others and may be able to use a one stop slower shutter speed (for example, use 1/60 second at the 70mm setting on the zoom instead of 1/125 second- please see earlier postings if you need to learn more about stops and how exposure works). In addition, if you are steadying yourself, such as leaning against a tree, you may be able to shoot at a slower shutter speed than the rule requires. However, it is best to follow the rule and even increase the shutter speed a stop or two if you have enough light and you are not doing something creative that will require a slower shutter speed.

If you have to hand hold the camera and are not leaning against a steady object, spread your legs so that you are sturdy and try to put your elbows into your side. This will steady your arms and, therefore, your hands will not move as much. Remember, draw in a breath and hold it and press the shutter release smoothly to get a less blurry picture.

Technique (Exposure)- The Sunny f16 Rule

You woke up, got out of bed, and wiped a comb across your head. Then danced outside into the sun and took out your camera and had some fun. Took a look at your image and what a site! Something that looked, well, totally white? Oh, my gosh, what a fright! I wish I could, I wish I might, be able to take a better photo tonight.
I've had these thoughts a lot when I first began photography. However, they did not come out in a rhyme. More like zxbhg! Who in the heck ever set up f stops so a higher number meant a smaller opening ought to be shot! With a camera, of course.
However, after reading a great deal of photography material and learning a few tricks, I actually began to get images that were, well, pretty good. At least they did not look totally black or white. I've mentioned one or two of these "tricks" previously, like using your hand to figure how to get a proper exposure. Another trick of the trade is the "Sunny f16 Rule." I'll call it Rule 16 for short.
Rule 16 basically states that if your subject is in bright sunlight its proper exposure is 1/your film speed (ISO or ASA) at f16. Thus, if your subject is in bright light and your digital camera's ISO is set at 200, your exposure is 1/200 second at f16. Your camera does not have 1/200 second? Choose the closest shutter speed, in this case 1/250 second. This exposure will be very close. There are a couple of caveats (isn't there always at least one caveat with rules). The first- the subject has to be about a square foot in size or larger. It doesn't work with closeups. The second- this general rule is for a subject that is neutral in color (close to 18% gray). Well, all of the world is not 18% gray (Praise the Lord!). What do you do? Well, what did you learn to do earlier when a subject is either lighter or darker than neutral? You open up or stop down, respectively, to give the subject proper exposure.

One other thing needs to be taken into account. Very white subjects, say a white bird, will tend to wash out. For example, you will not see feather detail because the bird will be too white. In this case, it is a good idea to stop down about 1/2 a stop to keep that detail in the bird.

Now you can use additional information you learned earlier to decide what equivalent exposure you wish to use for your subject. Need a faster shutter speed to stop the subject? Well, you can use f11 at 1/500 second, f8 at 1/1000 second, etc. Need more depth of field? Use f22 at 1/125 second, f32 at 1/60 second, etc. We'll learn later why it is not always good to use too small and aperature (to high an f stop number).

Wednesday, February 20, 2008

Composition- Lines and Angles

You've probably seen a picture of a winding path or road leading to a distant house. The photographer, if the elements were right, put mountains or hills in the background with a "V" just behind the house. Your eye follows the path to the house without you even realizing it. As your eye quickly surveys the scene it seems to eventually return to the house. This is the power of leading lines.
The winding path is called a leading line because it leads you to the house. So are the lines of the edge of the mountains (each side of the V) because your eye will follow these lines back to the house.
On a more artistic note (don't get me wrong, use of lines to lead the persons eye to the main subject can be artistic) lines and angles can be repeated in a picture to form a pattern. Ever see an image of trees with their shadows parallel which lead toward the trees at an angle (the picture was taken in the morning or evening to utilize the best light). Well, this type of image uses both repeating lines and angles. The repeating lines are not only the shadows that align along the ground but also the parallel trees. In addition, the angles formed by the shadows and trees meeting are also parallel and repeating. Note that the photographer has usually chosen a group of trees that are nearly parallel and equal distances apart. These types of stands form the parallel lines and angles that are evenly spaced.
There are other creative, individualistic uses of lines and angles to make a picture look interesting. Take a good, long look at this picture and decide what you see. Look at it a number of ways and try to see if it has different subjects. Then I'll tell you what I see.


I see several things in this photo. One is the classical answer- tree roots and their reflection in the water. I also see a small fish that is nearly all mouth (right side of subject) being swallowed by a larger creature. In addition, the "small fish" could serve as a mouth for the larger creature. Read all about it! The tree monster of the Tennessee River revealed in a photo! Did you spot anything that I did not?

Take a look at the inside of this hot air balloon.


You likely see some thin, black lines leading to the center. Now, take a look at one color. Do you see how it curves toward the center? All of the colors are doing so. If you looked at it from a distance, this is what you would see:


Did you see this pattern initially? Once you know the technical side of photography, you have to learn how to "see" to turn yourself from a good photographer to a great one. You do this by looking at subjects in different ways to discover what is really interesting about them. Now look at a very small version of the balloon (like you were standing way back from it):

I imagine you did not see this pattern when you first looked at the bigger picture!

Just as an aside, to repeat an earlier subject, what do you think of the colors of the balloon? Now look at it in black and white.

The lighter color still makes the same pattern, but the other patterns are lost. In addition, the image just lacks that blast of color! The black and white version seems lackluster.

Saturday, January 12, 2008

Which Way is She Spinning?

A poll was taken at the end of 2007 to January of 2008 to determine what proportion of people see this woman spinning either clockwise or counter-clockwise. See the results on the right side of the screen. Also, see the comments below.

Concentrate on the woman's movement. If you see her spinning clockwise, that means you're using the right side, or more creative side, of your brain. If she appears to be moving counter-clockwise, then that means the left side, or more logical side, of your think muscle is superior.

Monday, December 31, 2007

Composition - Color

Color is another important feature of photographs. Color affects the mood of people and has different meanings. Look at this website to get a quick view of its affects- http://www.infoplease.com/spot/colors1.html. Thus, you can invoke different emotions in your viewer by the use of color. This includes the blacks and whites.


How does the combination of colors in this picture of the Chincoteague Island lighthouse make you feel? If you were a mariner, you could probably see this lighthouse from a long way off.


Now, take a look at this photograph in black and white (I used a popular software among photographers called Photoshop to change the above photo to black and white and give it a different look).


I find this latter combination to be more soothing. However, the lighthouse blends into the background more and, therefore, does not stand out as much. Especially the house at the base of the tower. A lighthouse in dark colors may get lost in the background to a mariner viewing it from the sea. Perhaps this is why you don't see too many lighthouses in dark colors.

(Note that I place a branch in the photo to frame the lighthouse. I did take a photo of the lighthouse without the branch and find it less to my liking. You might find the branch distracting. Thus, the different tastes of photographers and the people that view their photos. Also note that I purposely broke the rule of thirds, although the house at the base of the tower is just below a focal point- this subject is made for breaking the rule in my estimation.)


Would the picture below have been as interesting if I had used two white balls? I don't think so.


Which colored ball attracts your eye the most? Note that the color of the orange stands out in this photo. You can tell it was either taken either early or late in the day by the shadows (late in the day in this case). You know from an earlier posting that the warm colors stand out early and late in the day. Thus, you can impact the viewer further through using techniques that further enhance the colors.


(Note where the balls are located- just about on a focal point. I also chose the close in view so the shoes would be at or near focal points. I think this adds to the photo because the eyes tend to move from focal point to focal point to gather all of the information to determine what is happening. You also know that shadows are longer during the early or late parts of the day. I think the shadows add to this photo. What do you think?).

Technique (Exposure)- The 18% Gray Card

Getting the correct exposure can be difficult in some situations, especially where the subject or the background is light or dark. The 18% gray card will help if you can use it, such as when you are taking a picture of a stationary subject.

An 18% gray card (may not be 18% gray on the screen and the white border is not part of the card).


Meters in cameras are set up to make everything an 18% gray. This is a standard in photography. Many subjects are about this color. If you point your lense at a white subject and it fills much of the frame, perhaps a white flower, and you use your camera's meter to set the exposure, the meter will try to make this flower 18% gray and the picture will be underexposed (the meter closes down to make the white subject gray). Likewise, the meter will try to make a black or dark subject, like a black bear that is really black (some are shades of brown), 18% gray and the picture will be overexposed. The following paragraphs explain how to use it and a way to use substitutes you always carry with you or that are around you.

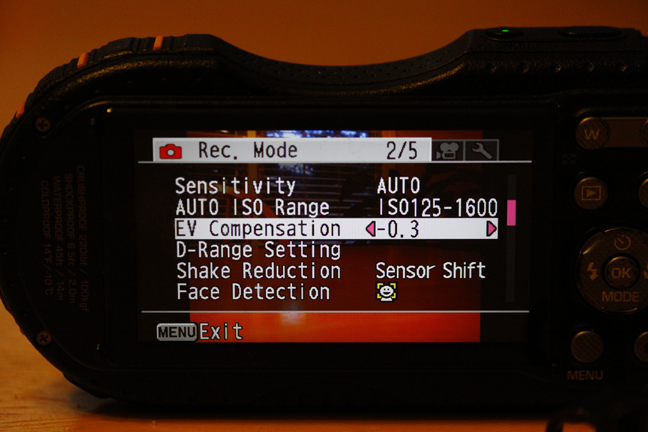
The 18% gray card is just that- it is a card that is 18% gray. Some other items have been made 18% gray and are of a different material that will withstand field conditions. To use it, put it in the same light as your subject (gray side up) , fill your frame with it (be careful not to throw a shadow on it unless you plan to take your subject in the shadow- the card must be in the same light as the subject)(also, be sure to fill the frame with the card if you are not spot metering because a light or dark background can change the meter reading when the multiple metering setting is going to read these light or dark backgrounds), and check the exposure reading your camera's meter gives you. This will be the proper exposure. It is that simple! Even so, you may wish to bracket the exposure (overexpose and underexpose) by 1/2 stop because some people prefer a slightly darker exposure and some a lightly lighter exposure.

Sometimes it is difficult to carry the card with you everywhere you go or one tends to get lazy and not want to do so. What can you do to make things easier? Well, we'll use something we carry with us all of the time, check the exposure relative to the gray card, and use this other item as a substitute card. I use the palm of my left hand because, like the American Express Card, I carry it everywhere I go (I really don't carry an American Express Card, but the jingle is appropriate). In addition, it is usually exposed when I'm taking a picture. Why the left hand? I am right handed. So, I hold my left hand's palm so it is framed by the viewfinder (or screen on a digital camera) and check the meter reading holding the camera in my right hand and pressing the shutter release halfway down to get the reading. Obviously, a left handed person would use the other hand. Here is what you do. Take a meter reading from an 18% gray card. In the same light take another reading from the substitute object you will use (again, I use my left hand's palm). Unless you are the right color of brown or something similar (you lucky devils) or you always carry something you can meter which reflects light of a similar color as an 18% gray card, your object will give you a different exposure. Note the difference. For example, if you use your palm and your skin is lighter in color than an 18% gray color, the camera's meter will show less exposure. Why? The meter wants to make that lighter colored palm an 18% gray so it will give you a meter reading that lets in less light than an 18% gray card. To make things easy, let's say your palm's reading is 1 stop lighter than an 18% gray card. You now use your palm to take future readings. However, when you use it the camera's meter is going to give you a reading that is 1 less stop than an 18% gray card, so when you then point the camera toward the subject it will underexpose the picture by one stop. You have to open up one stop from your palm's reading to get the correct exposure. The opposite would be true of a person whose object is 1 stop darker than an 18% gray card. They would have to close down 1 stop to get the correct exposure. Be sure to remember the object you are using as a substitute. Your right palm may be lighter or darker than your left!

I know. This sounds like a bunch of correcting to use a substitute. However, all you have to remember is how much you have to open or close down to get the correct exposure and the object you use as the substitute. If you can't remember, just figure the exposure compensation needed again one time during the day and you will likely remember it for the pictures you will take for the rest of the day [or week, month, year, etc. if you have a better memory -mine lasts about 3 minutes (just a poor joke; here's another- I might start using my gray hair as a substitute because it may be similar to a gray card)].

There is a way to estimate the correct exposure when you don't have your substitute available (I hope I always have mine!). As I noted earlier in the article, there are many objects that will give you the same or similar reading as an 18% gray card. To learn how to judge this, take your gray card reading and point it at various objects in the same light to compare the readings. You will see the ones that give the same reading. If you do this enough, you will begin to get a feel for the subjects that give you the same reading. Grass and green trees (not those that are reflective due to leaf coatings) tend to give similar readings as does the gray color of the bark of some trees. Even clothing that is the correct color can be good (then you can have your favorite shirt or pants for photography). You could purchase a camera bag or similar object for photography that you carry (manufacturers have figured out that they can make photography gear in a color that gives you the same reading). Do you have a favorite place you like to take photos? Find the objects that give you the same readings and use them in the future. However, remember that some factors can affect your readings. If that gray tree gets wet the meter reading may change. Likewise, the favorite pants may fade in the wash and get lighter in color. Will a hand lotion or a clean versus a soiled hand change your palm reading? It is wise to take a meter reading from a gray card and compare it to your substitutes once in a while (a dark soil on your palm may change the reading from a light soil, such as white sand). You can do this will a palm with hand lotion on it or soiled to compare the readings. Do you tend to use something else on that palm that may change the reading? Compare your palm with that substance on it to the gray card also.

There is another way to get the proper exposure during a sunny day called the Sunny f16 rule. We'll explore this in another post.