This blog post is in honor of a very special young woman named Mira. I hope Mira will become a better photographer than I. I'm sure if she is dedicated she will do so.
So what if you take a photo and it is slightly over exposed. That is, it is a little bit too light. You either turn your shutter speed up or close your lens (increase the f-stop) and give the exposure one less stop of light. This then makes the image underexposed or too dark. What do you do then? You could take the photo and manipulate the exposure in software loaded on your computer. If you are like me I'd prefer to try different things in the field to get the correct exposure. I'd rather be taking photos outdoors or elsewhere than sitting at a computer trying to fix images. This is where I begin to try such items as exposure compensation to get the right exposure and save the day.
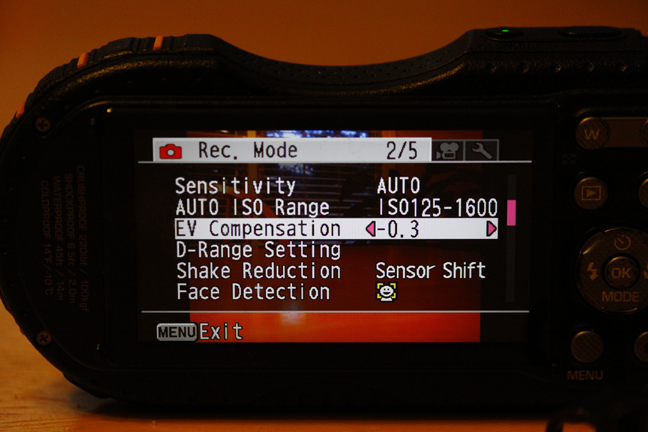
The exposure compensation or EV (Also known as eV) setting on digital cameras is usually in one of the menus. You have to either read your camera manual or play with the camera seetings to find the location. Below are two photos, one of the back of my digital point and shoot and the other my digital SLR.


Note the highlighted EV setting location in the first picture of the back of the point and shoot. The setting is -0.3. This indicates that the exposure that is set in the camera will be reduced by one third of a stop. That is, the image will be slightly darker than the exposure set in the camera. Also note the little pink arrows to either side of the -0.3 setting. The arrow to the right will increase the exposure by 0.3 stop for each click or toggle of the appropriate button. Thus, one click on this will set the EV to 0.0 (there will be no exposure compensation). One more click will be +0.3 more exposure and the picture will be slightly lighter. The arrow on the left side decreases the exposure by 0.3 for each click. Thus, if the camera is at -0.3 and you click the left arrow once the setting will go to -0.6. Cameras generally will allow you to change the exposure by up to -2.0 stops and +2.0 stops using the exposure compensation setting. This can normally be done in 1/3 stop increments. Thus, you can fine tune the exposure to get basically what you want it to be.
Look at the photo of the menu of the digital SLR camera (bottom photo). Just below the f-stop (F11) is a little item that indicates -2, 1, 0, 1, +2 with two lines in between each of these settings. This is the exposure compensation for this camera. By turning a dial or wheel on the camera one can move from between -2 (2 stops of underexposure) to +2 (2 stops of overexposure) in 1/3 increments. These are the same settings as the point and shoot but just displayed differently. What is the current exposure compensation setting on the SLR? If you said -1.0 stop you are correct. This means that one stop less light will be allowed when the exposure occurs (very shortly after the shutter button is pressed) and the image will look darker than with no exposure compensation. This particular SLR will also allow you to set the camera so it will make three exposures once you press the shutter. You can set it so it will make one image at no compensation, one at plus compensation and one at minus compensation. The amount of compensation can be set as well. For example, you can set the camera to take an image at -0.3, 0.0, and +0.3 stops of exposure compensation or -1.0, 0.0, and +1.0 by pressing the shutter once.
Just a side note. Look at the setting immediately to the right of the exposure compensation setting on the digital SLR. It currently is set at -2. This is a setting that permits the photographer to reduce the amount of light output by a flash. Thus, he can reduce the amount of light for the photo by reducing the flash output. Of course, a flash must be used for the photo. A setting of -2 when no flash is being used will not affect the exposure. The EV and flash settings can be used in combination to reduce the amount of light reaching the sensor that ultimately produces the image. Not all cameras have a setting to reduce or increase the flash output.
Practice with these settings. Use the same subject in the same light and take pictures while changing the EV setting. Then use the flash and use different combinations of settings of the EV and flash output to see what happens. You will notice that you can really fine tune the exposure of images using these settings.
Most people do not read the manual that comes with their camera. Thus, they miss little jewels like exposure compensation. I always read the manual when I get a new camera. This helps me discover where to set items like exposure compensation and discover unique abilities of the camera which I may not have known about when I purchased it. I'll end up re-reading the manual for some setting until I have used it enough that I no longer need the manual for that particular use.


No comments:
Post a Comment